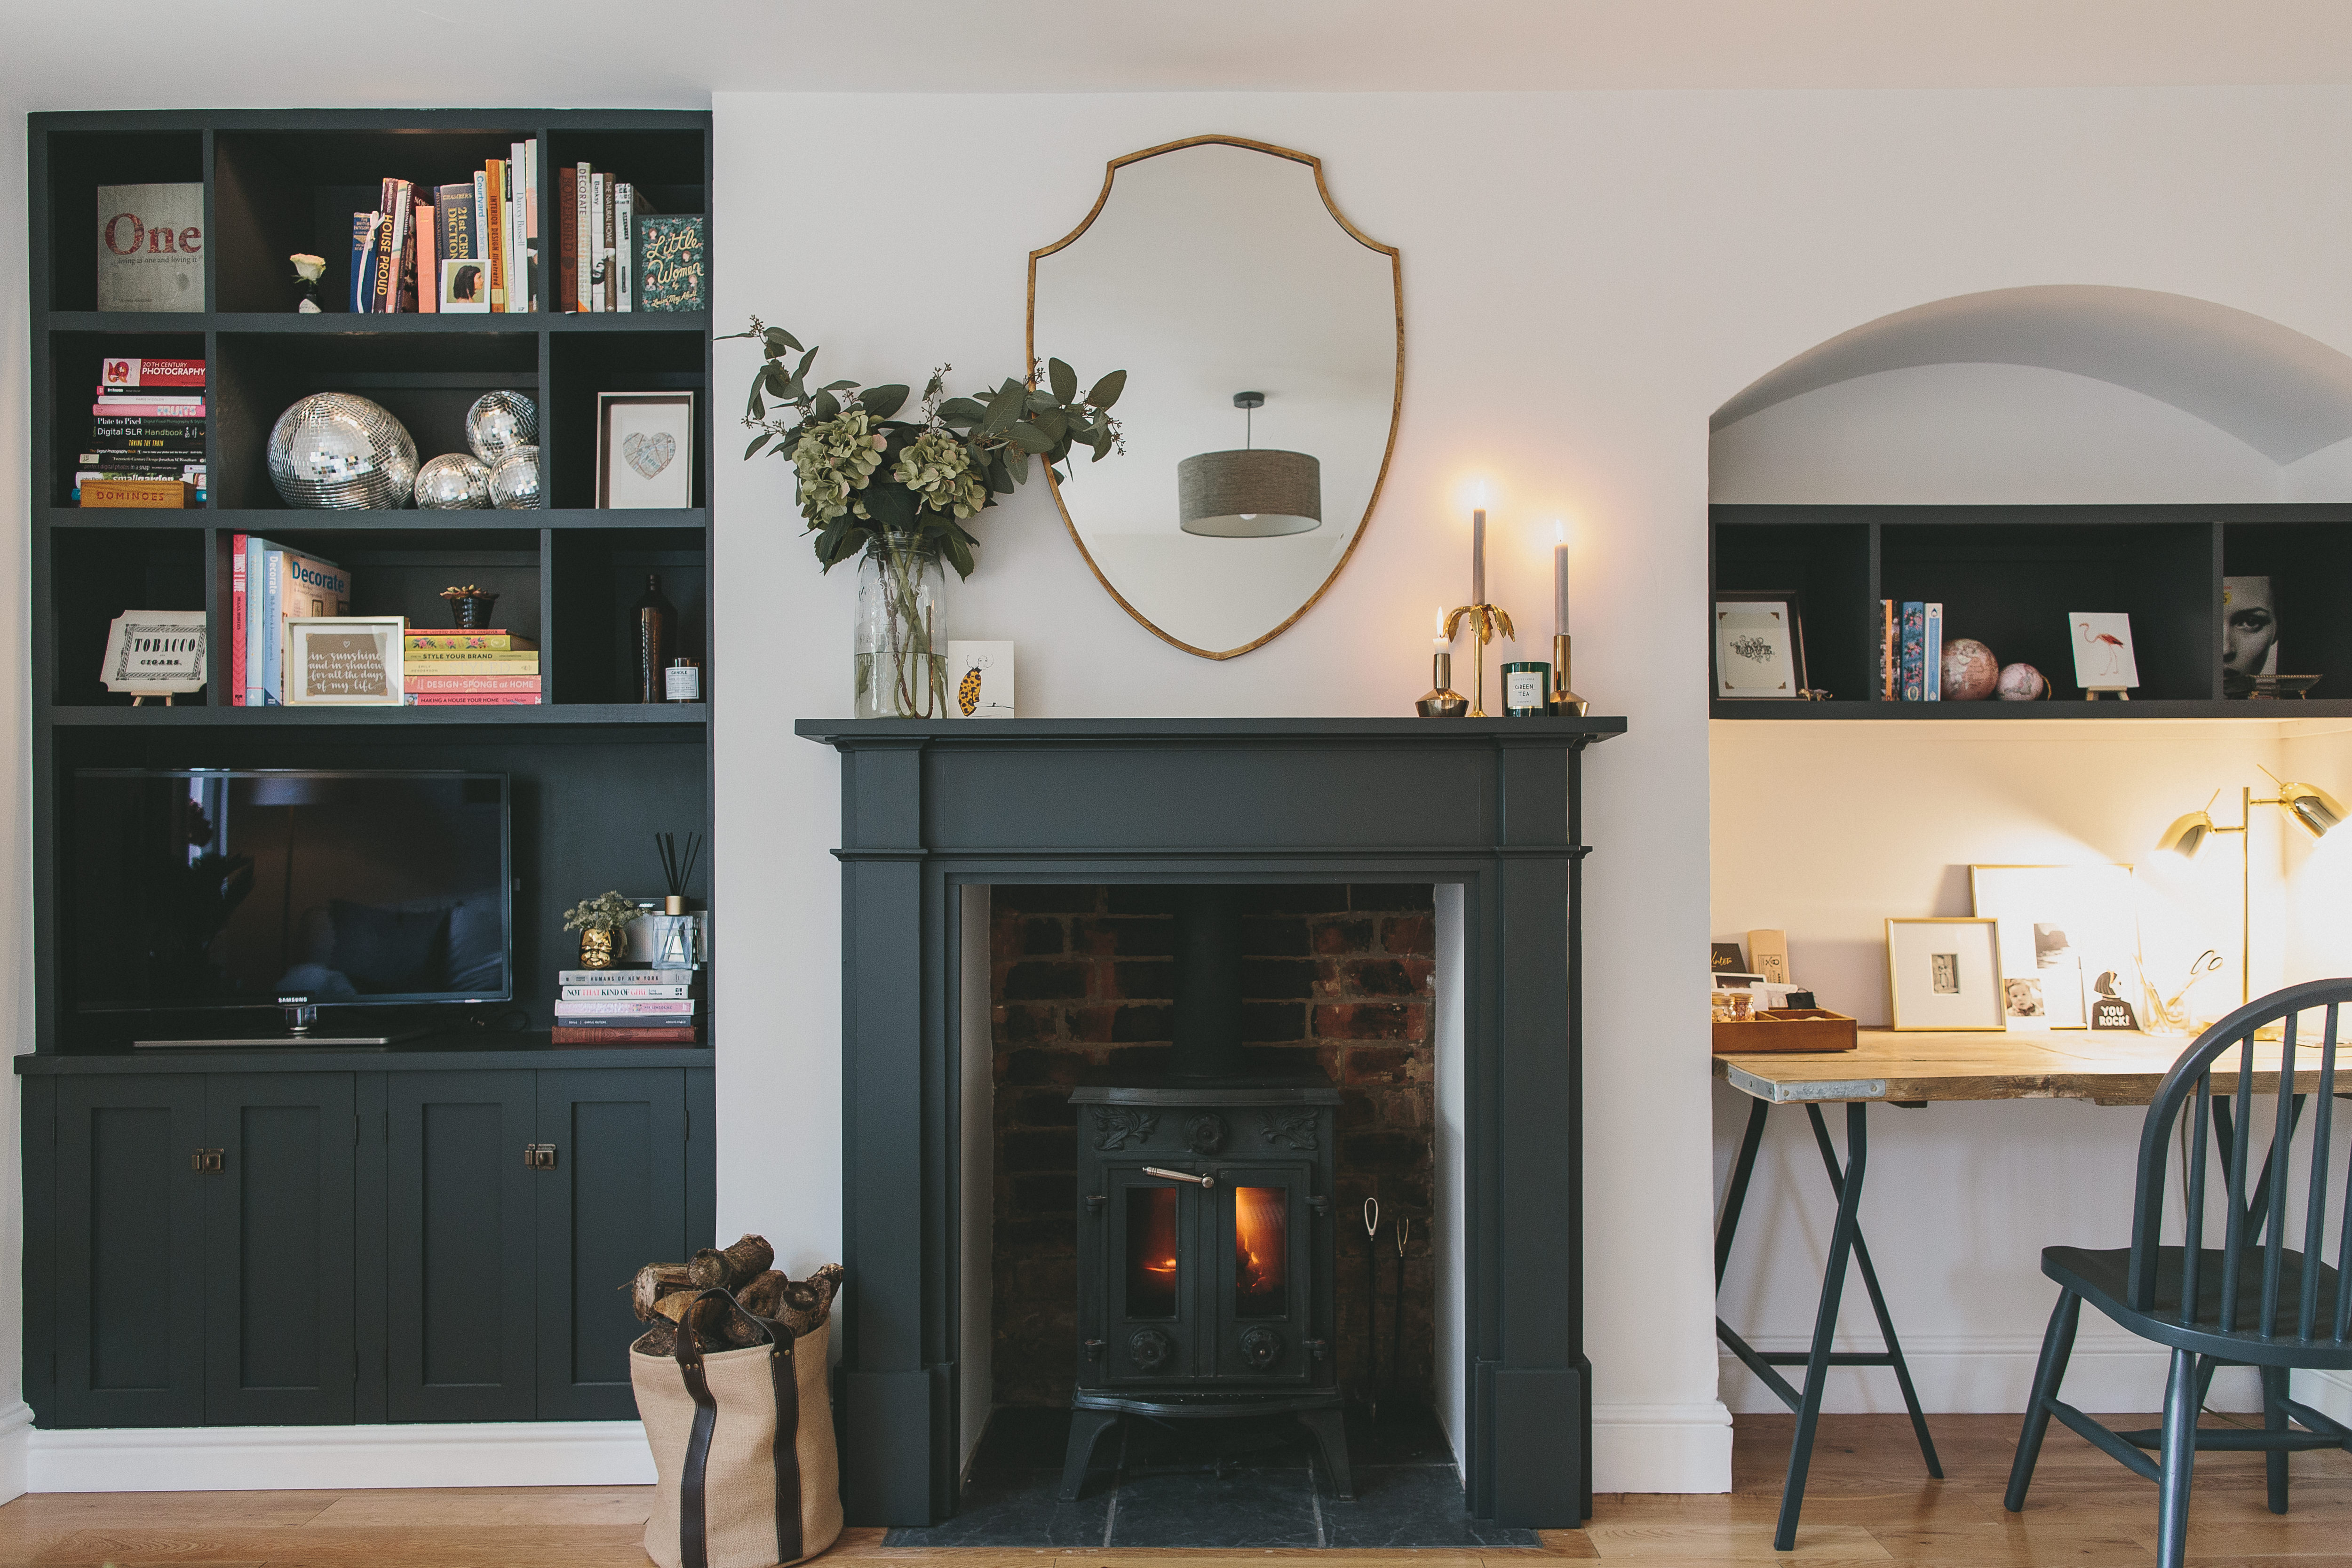
Towards the end of the summer, James and I were pretty much flat out working on our snug. I’ll be sharing all the snaps of the nearly finished room next week but for the moment I thought I’d share the bookshelves. A friend was quoted the best part of a grand to create something similar so I thought you might be interested in how we achieved a more budget option for our built-ins spending around £300 instead.
I apologise this is a very practical post, however I’ve thrown in a few styling tricks at the bottom for all of you who’ve stopped by for a spot of prettiness.
Inspired by a trip to designer Abigail Ahern’s house last year I was keen to try out some dark decorating in this room to really give it a snug, gentlemen’s club kind of vibe. We wanted storage, a TV cabinet and interesting shelving cubbies for all my coffee table books and all on a budget. I don’t ask for much.
- As a base we started with a bespoke Jali cupboard (which we also used in our main living room). To be honest given the effort we went to for the other shelving we could have built this ourselves from scratch, however we wanted a sturdy, well finished base as a foundation. If you’re not familiar with Jali they offer MDF flatpack furniture bespoke to your specifications. For this project we spent just over £200 on a simple built-in cupboard with one inner shelf and four slim doors adding twist latch catch door knobs from eBay.
- Armed with a back-of-a-fag-packet style drawing with some pretty precise measuring we toddled off to B&Q and bought what seemed like the largest sheet of MDF in the world for about £25.
- Thanks to their free in-store fancy cutting machine we came home with all the shelving and partitions to construct nine cubbies as well as various edging strips to cover the rough cuts.
- After we fitted the base unit we fixed batons of small strips of wood to the wall for the shelves to sit on. Once the shelves were in place we measured and cut the edging trim to go around the shelves and partitions (to make painting easier we didn’t fix the trim in place until after the shelves were painted). We then screwed the upright partitions in place.
- As you can see from the progress pictures we painted the bottom half of the cupboard when it was first built. The whole thing was primed and then James used a mini roller (the kind for behind a radiator) to apply two coats of Valspar Charcoal Sketch which was mixed at B&Q. We painted the whole area including the back all to give the illusion the entire piece is made of wood. I left this to cure for a few days before I put anything in place on the shelving.
- A few days later we added Ikea Dioder LED lighting strips under the three larger cubbies.
Then it was time for the fun stuff; arranging all my books and all the associated faffing. A few things I bear in mind when embracing the shelfie
- Stack your books in varying ways; lay some horizontal rather than vertical. You could even go wild and turn out the cover to add interest and a focal area to your shelf
- Mix in your personality with an eclectic mix of mementoes and treasures. I’ve never smoked in my life but the typography of the ‘tobacco and cigars’ sign from an antique shop really appealed to me.
- Don’t go for the obvious. My disco ball collection is a bit unexpected and I love how it contrasts against the dark background
- Add in florals, foliage or organic elements to soften the harder edges of the books
- Create mini vignettes with varied objects in differing heights to show off your wares.
Don’t get me wrong, we saved some cash here but oh my word it took flipping ages. I can see why a chippie would charge so much to do something similar. However I’m pretty proud of what we achieved and it ticks all my boxes so in the long run it was worth all the effort. See you next week with the rest of the reveal.



It looks fab Lauren, you’re a braver woman than me. I always bottle it and either get our joiner in or pop to Ikea.
I’ve been itching to ask – what finish have you gone for on the Valspar paint? …and how does it compare to F&B? It looks very Estate Eggshell. It looks perfect!
I have four pieces to paint in our bedroom so obviously I want to save some cash and get it right.
Your snug looks perfect, never ever apologise for practical posts; I’m sure I’m not the only one who loves DIY chat. xx
Hi lovely,
Yes it’s the eggshell and the finished effect is very similar to F&B. I have to say I left it a long time before I started any form of faffing as it did feel slightly ‘clammy’ for a few days. What material is your bedroom furniture? I think the finish on MDF or wood may be more durable than laminate for example as our large laminate cabinet hasn’t faired quite so well.
x
Oh thank you for the tips my love. We’ve picked up a load of ikea Tarva furniture so it’s unfinished wood. I’m also wondering if I’ll need a bit of knotting solution to start off with as we’re going very light with them (hunting for the perfect shade of white as always).
I think I’ll give it a go ?
I know what you mean about laminate. I’ve just repainted the dreaded hideous kitchen cupboards in F&B eggshell after the absolute disaster of Annie Sloan. Hoping it holds until we rip the lot out, but it’s gone on like a dream xx
Did you make the lovely fire surround too or was it a purchase?
Hi Andrea, we had it custom made through eBay but then there was a bit of DIY involved when it arrived. Will share more in next week’s post x
Hi there, can I ask where on eBay did you get you custom made one?
Looks amazing and is definitely something I am looking to replicate in my own dining room (need somewhere to store all the hideous plastic crap that is about to come my way with a new baby). The dark paint must have been petrifying to put on but it looks amazing, can I ask how you fit the lights in the cubbies? are they wired or battery?
Love the practical posts, this is useful information so don’t shy away from it!
Thanks Claire.
Yes the lights come wired to a plug (inside the cupboard) and James attached the wire on to the inside of the trim so it wasn’t visible. It comes with 4 LED strips and lots of long wires so you can be quite flexible.
You are so clever – thinks looks amazing and to think it was all achieved for £300 is really incredible! I just love the colour too – looks so striking. Can’t wait to see more pics of this room! xxx
Thank you Kate! The £300 covers the shelving unit on the right hand side too (in the arch) so we’re pretty happy with all the money we saved! x
I love your snug Lauren! And no complaints about a DIY post here either. I may have even sent a picture of your shelves to a carpenter a couple of weeks ago – will be interesting to see the difference in cost even though our alcove is larger I think. Our DIY skills are a bit sad compared your yours guys so there’s no way we could attempt this ourselves – well we could but the discoballs wouldn’t sit on the shelf for long. Really looking forward to the full post next week.
Lovely to hear we’ve inspired you Kat. It wasn’t particularly difficult just massively time consuming! x
Love this post, so interesting to see how you achieved this. I would love to attempt a project like this but we are so useless with DIY we always end up getting a chippie in. Can’t wait to see the next post on the finished room! X
Thanks Sarah, Lolly and I were only discussing yesterday about more DIY posts so it’s good to hear they’re appreciated! x
Looks fantastic, can’t wait to try something similar in my new home! Brilliant to have some DIY guidance too, has inspired me to give it a go on my own. Do you mind me asking what colour you used on the walls? Can’t wait to see the rest of the pics 🙂 xx
Thank you Sarah! The walls are Crown Sail White. We’ve used it in our living room too 🙂 x
Great thanks Lauren!
Great post keep them coming.
I am currently renovating our house, starting from the top down. I have opted for F&B Down Pipe on the walls. Your Insta account and now this post has given me the confidence to go for it, I just hope it works out…. Would you mind tell me where your brass mirror is from, I love it. xxx
Thanks Laura. I’m sure you’ll love going over to the dark side.
The mirror is from Barker and Stonehouse x
Brilliant post – love a bit of diy inspiration. If only we were as handy as you guys! Xx
Hello Lauren,
All your ideas inspire me and they have given me so many ideas!! I am in the love with your master bedroom wardrobe doors….we have just moved to the Warwickshire area and are in desperate need of a good chippy, can you recline someone in the area? Thank you so much in advance! X
Hello…can you please please please let me know where you got your fire place surround from? Your ideas are so lovely, thank you for the inspiration! Xx
Hello! Would you be able to tell me what height the Jali cupboard is? Random I know!
Absolutely love this snug. For the Jali unit, did you construct it and then fit it into the space or is it secured somehow? I would love a tutorial on this as I am about to embark on buying my first house and want alcove cupboards on a budget!
Absolutely loved your Jali shelving. I was trying to go about it in their customise section but am feeling confused Did you go for the cupboards for the down bit and add bookshelves on top?
Any help appreciated.
Thanks Resma, yes, just the bottom cupboard is from Jali. We built the rest of it using mdf.
Hello Lauren,
We have just finished redecorating our lounge and we have painted it Dulux dusted moss 2 and I am over the moon about how it turned out ( can’t say the same about Dulux chic shadow in the hallway thgh, is a bit lilacy 😢). I am planning on doing some alcove shelvings for my sitting room and am stumped on colours, don’t want it be dark , kind of want to blend in with the dusted moss 2 wall paint. Any ideas? F and B may be a bit out of my budget.
Hi there, Looks great, I’m currently in the middle on constructing something like this myself, I’m really interested to know catches/handles you used on the front of the cabinet doors if you’d be so kind?
Hi, This looks amazing! Just what i’m looking for but after just being quoted £1100 for built ins I too am looking for a DIY route. Could you please let me know how you fitted the jali unit? Did you raise it off the ground with legs? Did you have you have to attach it to the wall? And how did you attache the trim on either side? Sorry for all the questions but any help would be really appreciated. Thanks!
Come across this and about to take the plunge with Jali. Only thing holding me back are the measurements for alcoves!
Did you measure to the mm to the wall and shave to fit or did you leave some wriggle room? Also how did you get round fitting the unit around the existing skirting in the alcove? Any help appreciated!!!
[…] via […]
Hi! This looks great and I’ve been inspired to give it a go next week!
When I first saw the post a few months back there were some very helpful ‘work in progress’ pictures… but I can’t seem to find them now? Are they still available to view anywhere? It’d be super helpful if they are. *crosses fingers*