
Now before you get to thinking that we’ve truly lost the plot here at RMS HQ and that we’re trying to pioneer some kind of new-fangled cuisine, allow me to set the record straight. Today’s post is strictly to do with gardening…or rather more specifically to do with Spring planting that will give your home instant kerb appeal all the way through to June.
Apparently the Dutch named this style of planting, so called because different bulbs are planted in layers, just like the Italian dish. Choosing multiple bulbs that flower at different times will enable you create a successional floral display that you can be proud of. As so many of you asked for some tips in my previous posts on how to create such a look we thought we’d share a step by step tutorial this morning to help you out.
Let’s get started…
Step One: Choose Your Bulbs
Most spring bulbs can be grown in a lasagna planting, but for the purpose of today’s post I’ve picked three varieties that I think look good together and which I know will give a succession of flowers that will last for several weeks. My chosen combination will provide interest from late winter to the end of May.
First up is a Tulip named ‘Black Hero‘ which is a spectacular double version of Tulip ‘Queen of Night’. It’s tall and glossy and a dark purply black in colour which I think will look amazing paired with ‘La Belle Epoque‘ which is the softest blush swirled with what looks like coffee mousse. This variety has double flowers too and both tulips flower from April – May.
I’ve long since loved the bell shaped flowers of Snakehead Fritillary which are recognisable by their distinctive snakeskin markings. Opting for these bulbs is a bit of a risk since the plant tends to favour dappled woodland settings rather than grown in pots. They should flower around March to April time.
And for the very top layer it’s got to be Spring snowdrops. Galanthus elwesii produces some of the largest snowdrop flowers with a beautiful honey fragrance. These should flower from January to February.
If you’re not that enamoured with my choices, it’s worth trying a mix of dwarf Irises, Narcissi and Tulips instead.
Step Two: Prepare
Buy a large container; 30cm diameter or more is ideal if you’re keen to have a successful Spring display. Go even bigger if you can!
Drainage is key with bulbs, so all pots and containers need at least one hole in the bottom. These holes then need to be covered with pottery shards or pebbles to prevent the holes from getting clogged with earth.
Earth Up
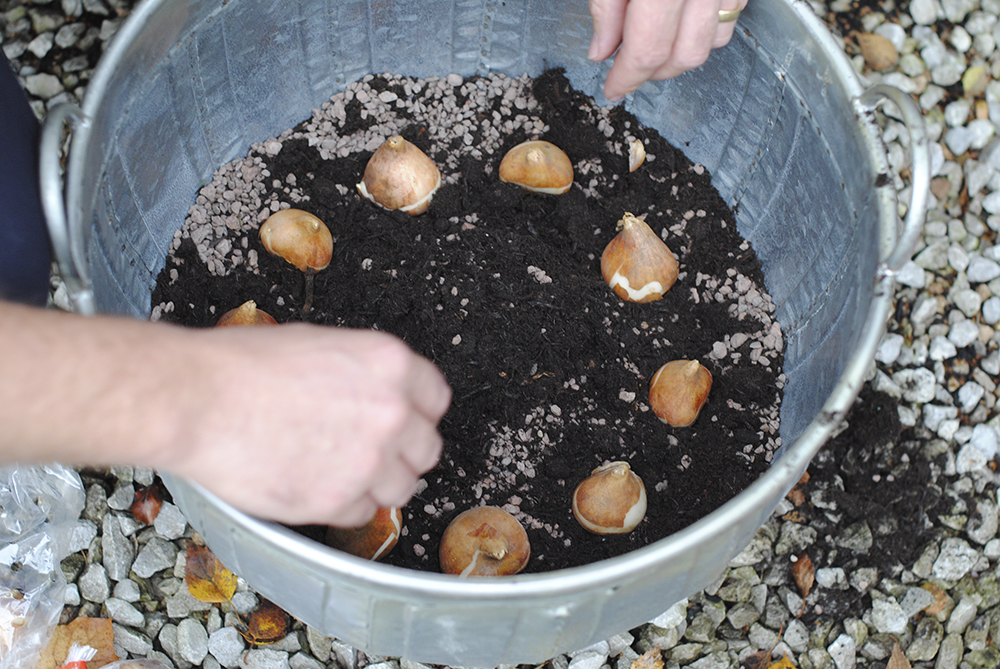
Next, add a layer of compost or bulb fibre to the base and a hefty amount of grit for drainage. The largest and latest flowering bulbs go in deepest, moving to the smallest and earliest in the top layer. With this philosophy in mind put your biggest bulbs in first which in my case are the tulips. They can be packed in quite closely, providing they don’t touch each other or the sides of the pot. About 1 to 1.5 inches apart is the right sort of spacing.
Cover with a couple of inches of compost, then add in the Fritillaries. I also add in additional grit with each layer and mix it about with my fingers a little bit. This helps with drainage and lowers the risk of your bulbs rotting over the winter (particularly if it’s a wet one).
Cover as before and finish with a final layer of snowdrops. Top up with compost and water your pot once you’ve finished your planting. I’d advise regularly watering the pot in the first weeks when the roots of your plants are forming as well to prevent the compost from drying out.
And there you have it! Easy peasy. Now all you have to do is to wait until Spring to see the fruits of your labours.
Have you indulged in a bout of horticultural lasagne before? Or will this be your first time? What will you plant? Why not share your thoughts in the comments box below…


I love a bulb lasagne! I’ve always gone with a traditional tulip – daff – iris mix but the last couple of years my daffodils have come up blind (no flowers) so I’ve had to change my tactic.
I was looking at buying my bulbs for this spring recently when I came across a ready made lasagne on Groupon by Suttons seeds. 38 bulbs, chosen to flower consecutively, all laid out in a biodegradable tray ready to just pop into a planter. There was an offer on 3 for £20, so I ended up with 114 bulbs plus a reduction in my gardening time for not very much money at all. I’m very much looking forward to seeing how they come up.
Sara you’ll have to let me know how you get on; I’ve seen these trays too but didn’t buy because I wasn’t sure how successful they’d be…
Also do you have any tips for why your daffs come up blind; I’ve had the same issue for the last three years and ended up throwing the bulbs away in frustration.
What great timing as we have just been given a massive bag of tulip bulbs by our lovely Dutch house guests. Is it the same process if I am going to plant them in the ground as well??
Hi Fleur! You lucky thing! If you’re planting in the ground it’s definitely worth planting them as deep as you can. Most gardening books recommend planting tulips at twice the depth of the bulb but there are quite a few Gardeners that recommend planting tulip bulbs much deeper….as much as 20cm deep. Tulips flower more reliably year after year if planted at depth (something to do with reproduction techniques) and there’s less need to stake if they’re lodged more firmly in the ground.
In the next couple of weeks I’ll be planting my tulip bulbs in the front bed. To start I’ll deep a deep trench approximately 15cm deep. It’s worth mentioning that if your garden has heavy soil, then I’d recommend covering the base with a good layer of horticultural grit. Add a handful of bonemeal to encourage formation of next year’s flowers and mix it into the soil/grit at the base of the hole. Then place the tulip bulbs, pointy end up, about 8cm apart and cover with soil. And then you’re done until Spring!
I’ve done this before with tulips, daffodils and irises. I wasn’t sure it would work so just got the bulbs from Lidl! It was kind of a success except the irises didn’t flower; maybe I planted them too deep. The varieties you’ve chosen look gorgeous though Lolly – I’ll have to get clicking to stock up for this year’s attempt!
I think quite a few suppliers have tulips on special offer Tracy at the moment so you’ll probably come away with a bargain or two!
Hi, I recently tried planting tulips in tubs and its looks like they have all been dug up! It was my first time though, do you think if I planted them deeper they would be safe from whoever is trying to eat them?
Possibly Anneliese…Another trick is to cover the top of your pots with chicken wire until the first foliage appears. Granted it might look a bit unsightly for now but it can be removed come Spring and your bulbs will be safe from foraging animals xx
I was going to mention chicken wire too. Had to add it to my daffodil planters after the local cats deemed them to be perfect for doing their business in whilst chucking compost all over the patio. My planters aren’t very deep so couldn’t quite do a lasagna but went for white daffs instead of yellows this year. Can’t wait to see some pictures of your pots next spring Lolly.
I love tuplips, especially the frilly double ones! Is now the time to plant them?
We’re about to move to a little house with a lovely garden so I don’t want to mess with the beds until I’ve seen what they do next spring/summer, but I could do a couple of tulip pots couldn’t I?!