
I have accumulated a rather large selection of craft related products. Washi tape, punches, stamps, thread… if it’s stocked in HobbyCraft then I appear to own it too. Last week the Rock My Style team raided my craft cupboard to make a few handmade creations that could be used for any occasion.
For all of these cards we used a simple A6 pack of kraft card and envelopes that were around £4 for ten. You can pick up your own via eBay or Paperchase. If you make a few of your own DIY designs then it’s far cheaper than hitting your local card shop.
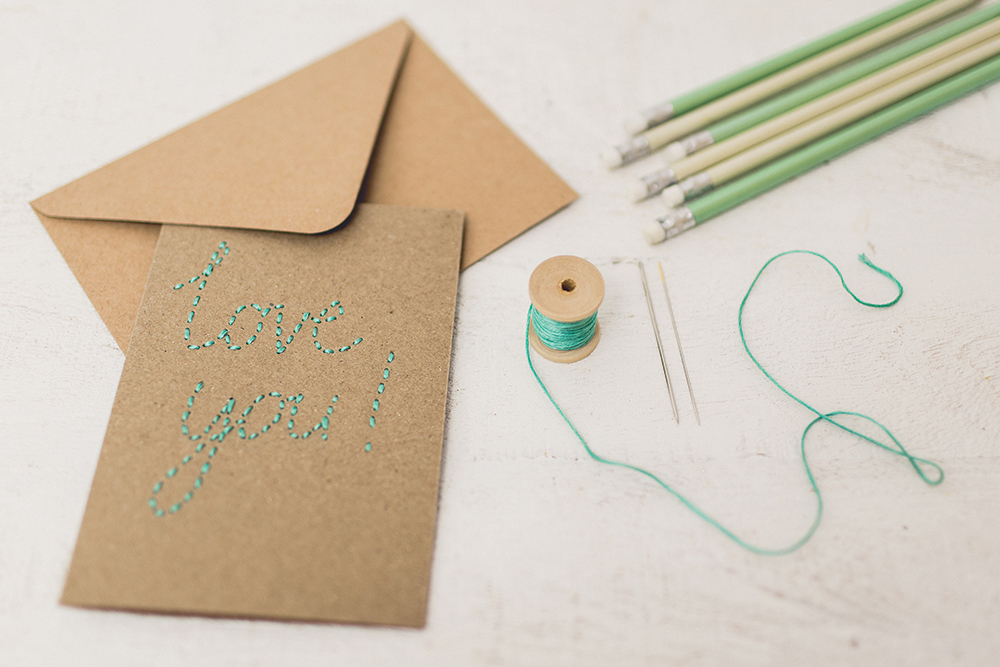
Stitched
[ezcol_1third id=”” class=”” style=“”]
{Materials}
Card Two darning needles Embroidery thread Rubber
[/ezcol_1third]
[ezcol_2third_end id=”” class=”” style=””]
[/ezcol_2third_end]
Stamped
[ezcol_1third id=”” class=”” style=“”]
{Materials}
Card Alphabet stamps (ours are from Oliver Bonas) Ink pad
[/ezcol_1third]
[ezcol_2third_end id=”” class=”” style=””]
[/ezcol_2third_end]
Embossed
[ezcol_1third id=”” class=”” style=“”]
{Materials}
Card Dymo embossed label printer Coloured envelope
[/ezcol_1third]
[ezcol_2third_end id=”” class=”” style=””]
[/ezcol_2third_end]
Blackboard Style
[ezcol_1third id=”” class=”” style=“”]
{Materials}
Card Chalkboard paint Small paintbrush Liquid chalk pen
[/ezcol_1third]
[ezcol_2third_end id=”” class=”” style=””]
[/ezcol_2third_end]
Bunting
[ezcol_1third id=”” class=”” style=“”]
{Materials}
Card Washi tape Bakers twine Darning needle This was probably the most fiddly one of the cards but probably only took about fifteen minutes. You make the bunting first and then the bows after.
[/ezcol_1third]
[ezcol_2third_end id=”” class=”” style=””]
[/ezcol_2third_end]
With Mother’s Day just around the corner, how about making your Mum a bespoke creation? We would love it if you share any of your designs with us via Twitter or Instagram. (We’re @rockmystyleblog).


I love a home-made card & have draws & draws full of crafting ‘stuff’ (much to the other half’s dismay!! heehee)
Only last night I made my mum a card for Sunday (but darn it, I forgot to get a snap of it!)
My favourite craft supply is my draw of pretty paper – it is full of patterned tissue paper, Paperchase wrapper paper, those books of scrap-booking paper, basically any pretty paper or card I come across is squirreled away in there! I then use it to make cute patterned backgrounds for cards or if there is a repeating motif, cut that out & mount on card to use on their own.
Am loving these ideas – especially the stitched card, that is too cute 🙂 xx
This sounds like my idea of heaven Rebecca! I love a fancy bit of paper x
My favourite crafty things are ribbons. My friends think I’m bonkers, but I have tons of the stuff. I can’t help myself when I see a reel of ribbon in a shop I have to have it. It even makes it onto my Christmas list each year (much to the amusement of older relatives). However, I have all this ribbon, and there aren’t actually that many uses for it… So I just get it out and look it is all from time to time.
Oh Clare, I have tons of ribbon too. If it’s on a reel then I’m even more drawn to it. I recently bought some ikea spice racks so I can display them so at least they can be in full view even if they don’t get used much!
Wow Lauren, I used to make my own cards al the time but now just don’t have time, you have definately inspired me to make my mother’s day card this year!! Thanks xxx
Mwah Lisa J. Make sure you send us a snap x
Some lovely card ideas, simple but effective. I make a lot of my own cards (check out my blog) but I have been in a bit of a crafting slump recently, having moved house. This has inspired me to get it all sorted to make a card in time for this weekend. Thanks!
Hi M-J, glad you’re feeling inspired x
Looove the blackboard paint ones. What am I saying, they’re all really nice!
Thanks Kitty, you’re always so sweet x
So adorable! I have to make thirty Mother’s Day cards with some very over enthusiastic six year olds this week. Think I might try the blackboard paint idea (providing I have woken up that day with the patience of a saint;) xx
Love all of these ideas. I too have a crafting stack that has taken over a good proportion of our spare room!
Hi Lauren, I have a question on the pen you use for the blackboard card – is it a specific liquid chalk pen, or just a white pen? I’m assuming a white pen would work? I struggled with my liquid chalk pen last night when trying to make a card..!! Thanks 🙂
Hi Claire, I’ve always got on well with the Posterman liquid chalk pens. You have to give it a good shake though and scribble on a bit of card first to stop it blobbing when you first use it. A white pen may work though but I’m afraid I haven’t tried one x
Thanks Lauren – I’ve now ordered the pen that’s in the picture and hope that one works a bit better! Thank you