
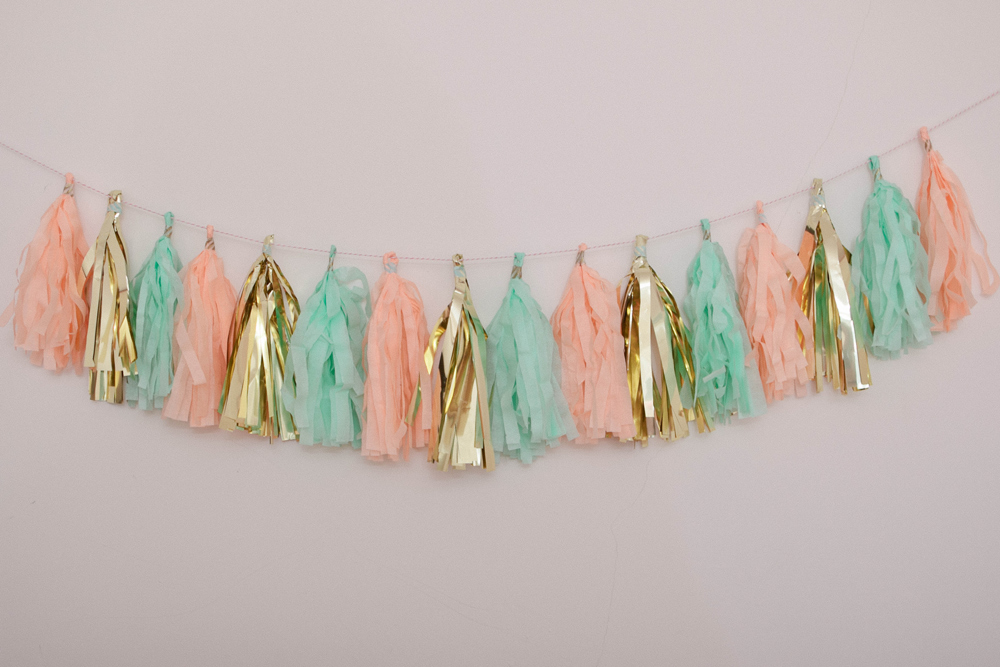
This super cute tutorial for a DIY Tassel Garland was sent in to us by my very own wedding photographer Rebecca Honeywell. Rebecca’s youngest daughter turned one last month and we have the images from the gorgeous party with treats galore to share with you soon. First though it’s over to the talented crafter to guide you through her creation of a fun fringed garland.
[ezcol_1third id=”” class=”” style=””]
{You will need}
Tissue paper sheets Sellotape or washi tape Scissors A pencil A ruler Twine or ribbon
[/ezcol_1third]
[ezcol_2third_end id=”” class=”” style=””]
Tutorial
1. Cut the tissue paper sheets in half widthways, then fold in half again. Draw a pencil line a ruler width from the folded edge.
2. Cut strips up to the pencil mark about 1cm in width – try to be fairly neat but don’t worry too much if the lines go a bit wonky
3. Open up the tissue paper lie on a flat surface. Using the middle of tissue paper, roll up quite tightly – the tassels will probably get in a bit of a mess so smooth them out as you go
4. Holding the edges of the uncut part of the tissue paper, twist tightly and then fold in half, leaving a loop
5. Tape the tissue paper together just below the loop – and you have your first tassel! Repeat until you have the number of tassels you need for your garland, and then thread twine or ribbon through the loops
[/ezcol_2third_end]
The garland can be scaled down by using smaller pieces of tissue paper to make tassels for balloons, chairs or even for the top of a cake. If you’re inspired to create your own then please mention us in your Instagram and Twitter photos so we can all take a peek. We’re @rockmystyleblog.


Hot footing it down to Hobbycraft right now as seriousy need some of these for my little girls rooms x
Make sure you send us a pic Charlotte! x
[…] DIY Tassle Paper Garland – From Rock my Style […]
[…] week we shared Rebecca’s DIY garland tutorial and promised to share the adorable photos from her daughter’s first birthday party. Well here […]
Hi there, could I ask where you got the shiny gold tissue paper from? Struggling to find any!